jonayres Posted September 4, 2017 Share Posted September 4, 2017 What an impressive result.It all looks really tidy. Why the 2.2 injection rocker cover? It certainly looks better than the standard 2.0 litre cover. I'm looking forward to the next installment. It's progressing much more quickly than mine! Quote Link to comment Share on other sites More sharing options...
The General Posted September 5, 2017 Author Share Posted September 5, 2017 Thanks for the comments. I used the alloy cover as the pressed steal one I had looked like it was battered about a bit. The alloy one does look better and it seals better. I have finished the car now, and she's going for MOT tomorrow. It's going to be Wierd as it's. The first time I've driven her since 2006! I will upload another update very soon. 3 Quote Link to comment Share on other sites More sharing options...
jonayres Posted September 6, 2017 Share Posted September 6, 2017 Wow, fingers crossed for the MOT. Looking forward to the update. Thanks for doing such a good job of reporting the progress. The last time I drove a manta was in 2005 on my wedding day when I had F777 CGP. The current one. B550 OPR will be my thirteenth Manta since my very first one that I bought in 1988 when it was just 4 years old - B102 PAA. I've even got a picture hung up of photos of some of them. At one time, I owned E444 XYC and E449 XYC at the same time. I learned that usually, a Manta with an exclusive logo on it was even more rusty than the others!. That's when you could buy a manta for about £500 with an MOT on it! I owned a white GSi - C793 KRO at the same time as F777 CGP too. Like you, I'm itching to get into B550 OPR - when it's ready! I think I might book an appointment with the doctor - surely there's tablets or therapy for this degree of lunacy?? HELP!!!! Project images are available to Club Members Only, Click to become an OMOC Member. Quote Link to comment Share on other sites More sharing options...
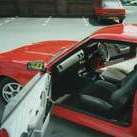
KAA Posted September 6, 2017 Share Posted September 6, 2017 Is OLY 403W in the photograph an original Centaur converted to later Manta appearance? Quote Link to comment Share on other sites More sharing options...
The General Posted September 7, 2017 Author Share Posted September 7, 2017 (edited) MOT PASSED !!!! All good, MOT tester said that he has never tested one before! He also said that as he only tests cars of a minimum of 3 years old, he has never seen an underbody so new!! Result. I have a couple of issues which have come up in the first 20 mile shakedown. The first is a brake issue (which I go into detail in the Tech Help Section) and the second is she don't like starting when hot. I have had this issue with this car before the refurb and I'm going to start by changing the Positive battery lead as this is as old as the car and if this don't work I will revive my old post in tech help! I will keep everyone updated as to its progress here. UPDATE: Brakes could be brand new warped disks! getting a DTI gauge to check. Project images are available to Club Members Only, Click to become an OMOC Member. Edited September 7, 2017 by The General 7 Quote Link to comment Share on other sites More sharing options...
The General Posted September 7, 2017 Author Share Posted September 7, 2017 Just come back from a run out (which was Semi successful) and I pulled a plug. Quite happy with that! I Have found I have a leaking brake pressure control valve, so that could be causing the brake issue, if you have ever experienced it look for my post in tech help/brakes and please place a comment. I have also (touch wood) cured the hot start problem which was I am sure was the main power lead to the starter. Changed this to a custom made one from Groves Batteries of Cheltenham and problem seams to have gone. I have had this problem since the original engine upgrade and it's been the major issue for years! All down to a cable which to the naked eye looks great! Project images are available to Club Members Only, Click to become an OMOC Member. 1 Quote Link to comment Share on other sites More sharing options...
Monaco Blue Posted September 7, 2017 Share Posted September 7, 2017 (edited) On 06/09/2017 at 09:56, KAA said: Is OLY 403W in the photograph an original Centaur converted to later Manta appearance? OLW403W is a converted Manta. It was registered in August 1980. Edited September 8, 2017 by Monaco Blue 1 Quote Link to comment Share on other sites More sharing options...
MANTAMAN Posted September 8, 2017 Share Posted September 8, 2017 On 06/09/2017 at 09:10, jonayres said: I think I might book an appointment with the doctor - surely there's tablets or therapy for this degree of lunacy?? HELP!!!! Yes there is help, it comes in the form of group therapy at the annual VBOA rally and if a full cure is not achived there is further therapy available in August at Opel Power Show in the Netherlands. Congratulations on getting your beautifully restored Manta back on the road, bet you feel chuffed to bits ! 2 1 Quote Link to comment Share on other sites More sharing options...
The General Posted September 9, 2017 Author Share Posted September 9, 2017 I am very pleased . I have a couple of teething issues to iron out, one is a braking issue which gives me a feeling like a warped discs, but after i trued up the new discs in the lathe they are well within tolarance (read my post in tech help). It could just be that the whole system is new and needs to bed in?? And the other is passenger window adjustment. My exhaust is very low and I have only managed to get 3" of clearance to the centre box. I have already "chipped" the paint on it !😂 Quote Link to comment Share on other sites More sharing options...
The General Posted September 16, 2017 Author Share Posted September 16, 2017 Sorted out the idling issue today. The brass throttle flap was not aligned properly and was not shutting properly. Now she idles like a new car. Project images are available to Club Members Only, Click to become an OMOC Member. 4 1 Quote Link to comment Share on other sites More sharing options...
MANTAMAN Posted September 18, 2017 Share Posted September 18, 2017 That picture says so much, not only do you have a beautiful bright Red Opel Manta just look at the rest of the cars in the picture, uninteresting modern blobs in black, grey and silver, if anyone asks why classic cars are so appealing heres the answer. 6 Quote Link to comment Share on other sites More sharing options...
Kevin Abbott Posted September 19, 2017 Share Posted September 19, 2017 (edited) Very nice. Few people know how hard it is to restore a car to this level. The blasting. Powder coating. Disassembly reassembly plating grinding cleaning it never seems to end. I wa speaking to my brother today regarding projects and just look at how many projects are ongoing compared to the completed ones shows how hard it is to get over that hurdle great job. Edited September 19, 2017 by Kevin Abbott 2 Quote Link to comment Share on other sites More sharing options...
The General Posted September 19, 2017 Author Share Posted September 19, 2017 Thanks guys, such kind words. I found that I needed to do something every day. If I found myself watching TV I would stop and say to myself "the pixies are not going to fix it for you so get out in the garage and complete something!" The support of my family to be able to dedicate the time to this was paramount. But also the support from the OMOC members is what has helped me most get this car done. The My Projects section was a thing that I made myself accountable to and I will keep updating it with little mods etc. I have a manta 400 bonnet that I'm thinking of fitting so that might be a future amendment. Top tips: yes one. Get a old PC, give it internet access and put it in your garage. It was a big help to have the forum in the garage an in some cases I was getting real time advice especially with my braking issue. Thanks go especially to David AKA mantasrme for parts and advice, and everyone who has given me practical advice over the course of the build. I would have not got this done without you all Quote Link to comment Share on other sites More sharing options...
The General Posted April 17, 2018 Author Share Posted April 17, 2018 (edited) ENGINES !!!!! ARGHHHHHHHH! Well its been a busy winter in my camp this year! I've had a few issues, and thanks to some of the members its all going good for now! Here’s what has been happening and I hope you enjoy this mega Manta update. ____________________________________________________ I started off the winter on a bit of a downer actually. I was hoping to finish the car to take it away to the Gower for my anniversary in October, but the Engine that I rebuilt just using new seals was still pulling in oil past the seals and down the guides. I was hoping that the cleaned up and rebuilt lump would last a couple of years but unfortunately this wasn’t going to be the case. She ran sweet for about 500 miles, and then started to smoke a little bit on hard acceleration and I knew that the prognosis of this was not going to be good. After about another 100 miles it was smoking on start-up, not lots but enough that I didn’t like it! To top it all off on her last outing the heater matrix decided give out and started to turn the interior into a Swedish sauna with a pinhole in the lower matrix body feeding little wafts of smoke up through the windscreen vents. That my friends was enough!!! I placed her in the garage and stopped to think and sulked a lot! A bit depressed and a bit disheartened I thought that I would put up a parts request on the forum for a good 2.0E engine, also put feelers out for engine rebuild advice of which I got plenty. December came and went, but in January I had a message from @Mantacol asking me if I was still in the market for a good low mileage engine as he had a 58,000 miler out of an exclusive that he had up for grabs. He said it’s been sat for about for a few years, but it was a great engine when he removed it. Colin lives about 200 miles away from me, but it sounded to good to be true a 58,000 miler!!! We settled on a price and then my wife and daughter and I set out for the journey up to north Wales. Colin and his Wife were really lovely and he showed me his/her/their (you will have to inform me on that one Colin) 400R which is really looking the part. I made a frame out of 75mmx75mm timber to hold the engine securely in the trailer for the journey back so it wasn't rolling around. Project images are available to Club Members Only, Click to become an OMOC Member. The engine apart from being covered in dirt and crud was all there, complete with inlet and exhaust manifold, injectors, throttle body dizzy, so I knew that is not been messed around with. The sump was off and the bores looked unmarked and clean and shiney like they do after a few miles. On removal of the manifolds there was no evidance oil staining on the exhaust guides or in the inlets. Even engines that have been left for a while can still show evidence of these faults that can indicate worn guides. Project images are available to Club Members Only, Click to become an OMOC Member. The first job was to remove the water pump. The water pump had seized up solid , but this didn’t matter as I already had a one to go on that was on my original engine. Although I know this is not good practice it had only done about 600 miles so I thought I would use it. After spraying a can of WD-40 on the bolts I managed to remove them. I’m sure this was the original water pump as these bolts felt like they had never been removed. I always take extra care with these bolts as if you dont you can end up taking the threads out with the bolt! Behind the pump lay corrosion but this soon cleaned off and after I gave the engine a good wash and brush down with white spirit things were starting to look a lot more like it! Project images are available to Club Members Only, Click to become an OMOC Member. After the wash and dry out of the engine every thread in the water pump housing was cleaned out. Lucky I had some extended taps to do the threads in the block that run through the front timing casing. I cant recommend doing this enough as the steel bolts corrode quickly against the alloy and create lots of white dust which block the threads up giving false torque readings. It can also restrict the depth that the bolts go in, and in some cases strip threads giving you all sorts of problems with leaking water pumps. Project images are available to Club Members Only, Click to become an OMOC Member.Project images are available to Club Members Only, Click to become an OMOC Member. After I had bunged everything up it was to work with the grinder with a rotary wire brush on the cast iron only. I love this tool as it cleans the pours of the cast iron and makes it all nice and new looking. After the engine is made dirt free, any threads were cleaned out with the correct tap, and then I masked up and sprayed to match the engine that was to come out of the Manta. Project images are available to Club Members Only, Click to become an OMOC Member. While the engine was out I decided that as she had been stood for a while it might be a good shout to give the lifters a once over. And im glad I did. They were solid with tar and only 3 of them had any movement in the head of the lifter at all. It took me nearly 4 hours to disassemble them. The internal piston on most of them was gummed into the lifter so bad that even soaking them in brake cleaner did nothing. Using the air tools to blow through the tiny oil gallery in the side of the lifter helped to work it free. All the lifters were completely stripped, checked and rebuilt and operated as they should. Project images are available to Club Members Only, Click to become an OMOC Member.Project images are available to Club Members Only, Click to become an OMOC Member. The removal and insertion of the engine was as always very straight forward, but fortunately I managed to get hold of a brand new original GM stamped clutch plate for the GT/E so that went in as well. After I connected every up watered and oiled her, I primed the oil system by using a tool I have made to go into the oil pump drive socket. I place it in a power drill at a moderate speed and keep going until oil starts coming out of the 8th lifter and running down the slope by the oil return pipe at the back of the head. Everything in the engine had already received a coating of oil cam, camchain, crank, bearings, bores Etc. as the sump had been off the engine, and I had removed the cam covers to clean and lube everything. THE START UP Project images are available to Club Members Only, Click to become an OMOC Member. She started first time. Ran a little lumpy as they do for about 10 seconds and then ran fine. There was a little smoke coming from the exhaust, but I wasn’t worried at this stage as everything had just been oiled up and this was expected. I got her up to temperature and shut her down and removed a plug and there it was..... Oil. I also had oil in the inlet manifold, quite a lot of it as well. The 2.2 rocker cover looks great, but even after cleaning out the mesh in the rocker cover I was still getting the oil in the inlet manifold and it was sucking down the engine breather pipe. I decided that I will go back to the standard rocker cover as the breather exit is very high, in fact it’s on it's own little box on top of the rocker cover, compared to the 2.2 one which exits from the side of the cover quite low down. After cleaning up and spraying up the standard cover and fitting, I still had this problem. After chatting with @mantasrmehe reminded me to clean out the oil breather gauze in the rocker cover as this condenses the oil. I removed them from both ends of the cover and they looked like they had been baked in tar. Once these had been cleaned and I had cleaned as much oil as possible from the manifold out I had no more oil in the manifold!…… But I still had oily plugs. ARGHH! @H-400 pipes up here and tells me that it’s probably the valve stem oil seals, but first to check out the compression. I had a old compression tester so I screwed it in and each cylinder was making 170PSI, more importantly as David said they were all the same. This was great news as this proves that the bottom end is good so I must be sucking oil down the guides!! AGAIN! At 58,000 miles I dont think the guides should be that worn. There was hardly any sludge in the engine or around the top of the head, so taking onboard all the advice I have been given I surmised (and prayed) that it must just be the valve stem seals. Project images are available to Club Members Only, Click to become an OMOC Member. I made a tool to compress the valve spring using a old rocker. I had to cut this out with a 1mm disk cutter blade as these little suckers are very hard. With the piston up to near TDC and 2M of clean braided ratchet strap cable poked down the plug hole, I backed off the rockers on number 1 and brought the engine up towards TDC until I could feel resistance. I proceeded to remove the inlet valve using my tool and once the collets had been removed and the spring out, I could gain access to the seal. I gently prised the seal off with a flat blade screwdriver and removed it and it was like concrete. The “rubber” was as hard a a Bic biro pen. The seal you could waggle on the stem where it had shrunk due to no oil and lack of use. Project images are available to Club Members Only, Click to become an OMOC Member. If you look at the image of the two seals together you can see the size difference of the inner hole. Although the stem fitting hole on the new one is smaller the inner hole on the new seal is the correct size as it slips down the valve nicely. The seal did not look worn or misshaped but it had just dried out. Project images are available to Club Members Only, Click to become an OMOC Member.Project images are available to Club Members Only, Click to become an OMOC Member. At this point I could have jumped for joy, as this must be the issue. After chatting with Herman I wanted to get hold of the Victor Reinz style seals with a spring around the stem hole. These seals are far superior to the standard ones as they also incorporate a metal body. Unfortunately the only place to get them from is Germany, so I waited a week for them to arrive. New exhaust seals were also ordered as the old ones had stretched and were slipping up and the valve stem. Project images are available to Club Members Only, Click to become an OMOC Member.Project images are available to Club Members Only, Click to become an OMOC Member. Replacement of the seals went like a dream. But before I ran the nice new seals down the valves and chaffed them up on the sharp edges I made some seal protectors using heat shrink tubing over the valves as a sleeve was not sent with the seals. These tubes slip nicely off the valve after the seal has been placed on the guide. Just for reference my method for the exhaust guide seal replacement is : First, clean everything. (1) Turn the Rotorcap upside down and fill with oil and put it on. (2) Place on the valve and spring and spring retainer cap and shroud (3) Compress the spring (4) Oil your valve stem and place on your seal protector (5) carefully place the seal over the seal protector and push it virtually to the end of the protector. (6) lift the seal protector slightly until the seal groove is uncovered (7) Gently push the seal off the end of the protector into the groove using something like a WD-40 red tube. You may have to wiggle the spring retainer cap slightly. (8) Pop the collets back in (9) gently unscrew the rocker, making sure everything is nicely in place. This I found is the best way. Project images are available to Club Members Only, Click to become an OMOC Member. Once everything has been reassembled and valve adjustments made I started her up ran her, and although I didn’t have any oil any more, my plugs were a little sooty. After testing the ECU temperature sensor (that checked out OK) I found that the previous owner of air flow meter had turned the airscrew right in. I plugged in a Gunson’s Colortune into number 1 plug and turned the air mixture screw out ¼ of a turn at a time and after 1 whole turn out the Colortune went blue. This is now what my plugs look like ! All 4 of them. No oil, and all the perfect colour. So I figure the moral of this update is this. Without this club and this forum I would have been lost. I wouldn’t have had a replacement engine, and I wouldn't have had the help and support to put this engine back into first class working order. So thanks go to Mantacol for the engine (Cheers buddy I owe you one) H-400 & mantasrme for the technical reference / guidance and encouragement Next update making a boot carpet for a coupe! Edited April 17, 2018 by The General 11 Quote Link to comment Share on other sites More sharing options...
mantaray Posted April 18, 2018 Share Posted April 18, 2018 Great news, glad you got her all sorted. Some people still morn about the £25 membership fee, but I'm sure you feel that your £25 was well spent. This is a great forum with very helpful members and worth £25 of anybody money. 2 Quote Link to comment Share on other sites More sharing options...
Danny D114BCW Posted April 18, 2018 Share Posted April 18, 2018 Great write up, thanks for taking the time to do that. Very interesting and handy to know. Enjoy the summer. 1 Quote Link to comment Share on other sites More sharing options...
Julian Posted April 18, 2018 Share Posted April 18, 2018 What a write up that is. BRILLIANT. even a school kid could follow it. By the way do way give OSCARS in this club? 1 Quote Link to comment Share on other sites More sharing options...
mantaray Posted April 18, 2018 Share Posted April 18, 2018 That would also make a great write up for the club mag.......If you still have it all on your PC, email it over to Alan or me, Please. 2 Quote Link to comment Share on other sites More sharing options...
The General Posted April 18, 2018 Author Share Posted April 18, 2018 12 minutes ago, mantaray said: That would also make a great write up for the club mag.......If you still have it all on your PC, email it over to Alan or me, Please. I will edit it for typos and send it over. I have all the images in in full size or are reduced ones good enough? Quote Link to comment Share on other sites More sharing options...
®evo03 Posted April 18, 2018 Share Posted April 18, 2018 Great stuff, i can feel a use for this coming on! maybe, it would be great in the magazine, could you add tap and dye size used for handyness? Also supplier list for seals would be handy, did you inspect lower internals of block at any time? 1 Quote Link to comment Share on other sites More sharing options...
H-400 Posted April 20, 2018 Share Posted April 20, 2018 This should be copied to use at school! Clear, and documented with great pics! My 17 year old son is studying car-mecanical at school. His teachers don't know I am professionel a car/truck mecanical cause I don't want he will have bad infleuences cause his old man is... Sometimes I look over his shoulder and as a dad I help him with some homework. You don't want to know what stuff they teach our kids at school! @The General: the trick with the shrinking tube is nice, never thougt on that! Happy I could help you, grts Quote Link to comment Share on other sites More sharing options...
mantaray Posted April 20, 2018 Share Posted April 20, 2018 On 18/04/2018 at 19:33, The General said: I will edit it for typos and send it over. I have all the images in in full size or are reduced ones good enough? That will be great thanks. Images are best with a min of 1MB file size and 250/300 dpi resolution. Quote Link to comment Share on other sites More sharing options...
The General Posted May 6, 2018 Author Share Posted May 6, 2018 (edited) Project images are available to Club Members Only, Click to become an OMOC Member. Well after about only about 450ish miles on the road, some w@nker in of all things a recovery truck decides that he is the only person in Cheltenham that doesn't have to give way to the right on a roundabout. He approached the junction at well over 25mph and didn't even brake. I didn't even see him coming until it was too late as it's a T-Junction with a mini roundabout on it! SLAM ! I scrubbed off all the speed I had (about 5mph) and his truck did this to my 18 months of work! The front bumper came off like someone had pinged an elastic band off a finger and went flying across into the path of the oncoming traffic. The criminal (as I now call him) thought that we could sort this out without using the insurance companies, of which I just laughed and said " This isn't a Mondeo, you haven't got a clue what you have just damaged". I have three witness's to the incident all of which loved the car, one of which I though was going to size up to the guy by shouting at him "You were not going to stop for anybody were you"! So this is how we stand at the moment, and it just seams that I am never going to have a Manta for the summer! RANT OVER! So where am I in this saga, I need some help here. I have informed my insurance company, got all the images, but they cant validate the claim until Tuesday because of the bank holiday weekend. So today I am going to do my own assessment and present it to the assessor when I see him. It's a classic policy through Footman James with a agreed value so I'm sure its going to be repaired rather than replaced. I will be looking for someone to take on this work so if you are interested let me know, but I'm sure that I'm going to have to go parts hunting. I'm sure it will need a re-spray as I cant see the front of the car matching the back after all the work has been done. I am going to start a post on the parts wanted list called "Front End Parts for The General" I will be asking in the parts wanted list if these parts can be reserved for me as I'm uncertain how this works with classic insurance around parts and paying for them Etc, but if I can present the assessor with a parts cost I'm sure it will be beneficial. Thanks Guys Project images are available to Club Members Only, Click to become an OMOC Member. Edited May 6, 2018 by The General 2 Quote Link to comment Share on other sites More sharing options...
Mike. Posted May 6, 2018 Share Posted May 6, 2018 I’m gutted for you given all your hard work and effort that has went into your build. 1 Quote Link to comment Share on other sites More sharing options...
The General Posted May 6, 2018 Author Share Posted May 6, 2018 (edited) 26 minutes ago, Mike. said: I’m gutted for you given all your hard work and effort that has went into your build. Cheers Mike, I just don't feel I'm allowed to have anything nice at the moment. My family all went without to sort her out because they wanted me to have this. I have a loving family (which is really all that matters), but we struggle in life as my wife is permanently ill, and this was our bit of luxury. I'm just in that "downer" mood at the moment ! LOL. It's the risk we take unfortunately, we have these lovely cars and this proves that shit does happen....... mainly to me! I just hope I don't get any shit from the Insurance claim and it all goes smooth otherwise I might just flip my tit! Edited May 6, 2018 by The General Quote Link to comment Share on other sites More sharing options...

Recommended Posts
Join the conversation
You can post now and register later. If you have an account, sign in now to post with your account.