Kevin Abbott Posted November 12, 2012 Author Share Posted November 12, 2012 I love the look of these cars,i would love to convert my coupe to an Ascona front end. I have always liked the Ascona. Are the parts that hard to get to do the conversion. Cheers Raymond. I have all the parts to do the conversion for sale. It takes a day to do and the hardest part is getting the manta front nose cone off clean. Then cut 6" off the front of each chassis leg Weld Ascona front end on Bolt the other parts on I love manconas Quote Link to comment Share on other sites More sharing options...
lammy Posted November 12, 2012 Share Posted November 12, 2012 I have all the parts to do the conversion for sale. It takes a day to do and the hardest part is getting the manta front nose cone off clean. Then cut 6" off the front of each chassis leg Weld Ascona front end on Bolt the other parts on I love manconas I just sent you a message in the parts for sale,i am interested in the parts to do this,what price do you have in mind. Cheers Raymond. Quote Link to comment Share on other sites More sharing options...
opelmantagsi Posted November 13, 2012 Share Posted November 13, 2012 ^^ can recommend Kevin as a good parts supplier, everything I have had from him has been exactly as described, with no surprises. Kev knows his Mantas 1 Quote Link to comment Share on other sites More sharing options...
monzta Posted November 13, 2012 Share Posted November 13, 2012 Love the CC with Ascona front end. Its a winning combo, especially with the twin headlight kit and irmscher sport front grille. Will be following this What colour are you planning. Mine was sunflower yellow wich honestly was a little too much Quote Link to comment Share on other sites More sharing options...
Kevin Abbott Posted November 13, 2012 Author Share Posted November 13, 2012 Raymond PM replied to My plans were to do the car a titanium colour with 1800 exclusive green glass ( that was the hardest stuff to find) and anthracite wheels. Stock mint exclusive grey red piped interior My little brother (26) now owns the car and as he's way younger than me I need to reign in some of his ideas! Subaru blue and black wheels has been mentioned. I will have to put my foot down as the car has nice clean lines and a crappy colour will spoil it. Quote Link to comment Share on other sites More sharing options...
monzta Posted November 13, 2012 Share Posted November 13, 2012 Oh the subaru blue is very overused here in Denmark. And has been especially on the Mantas for many years. Ford blue metallic is also one of the more used colours. Personally i have always loved the 70´s colour schemes before metallic was fasionable Like this: But thats just me Everyone has their own ideas about styling and colouring of the Manta 1 Quote Link to comment Share on other sites More sharing options...
opelmantagsi Posted November 13, 2012 Share Posted November 13, 2012 I think it would look awesome in white, but I am bias as I am going with white myself. this has made my mate that's painting the car very happy as well. Quote Link to comment Share on other sites More sharing options...
mantasrme Posted November 13, 2012 Share Posted November 13, 2012 My little brother (26) now owns the car and as he's way younger than me I need to reign in some of his ideas! Your not wrong, these youngsters have some funny ideas about things Quote Link to comment Share on other sites More sharing options...
mantasrme Posted December 9, 2012 Share Posted December 9, 2012 So a little update on the Mancona hatch. It arrived at my workshop a little while ago now and after a good look over it i made up a list of a few parts required before i could get it up and running Now that some of those parts are on their way to me i thought it was time to start workng on it. So from this A day taking bits off has resulted in this First job is to finish off the mounting of the calibra fuel tank and working out where the filer pipe and exhaust can run. Then a bit of a tidy up of the boot under floor, followed by cleaning back the floorpan and treating/undersealing it all With that done it should just be a case of running fuel and brake pipes and bolting everything back on 1 Quote Link to comment Share on other sites More sharing options...
Kevin Abbott Posted December 9, 2012 Author Share Posted December 9, 2012 Wooooooooooooooooooo It's coming on ;-) Quote Link to comment Share on other sites More sharing options...
Kevin Abbott Posted December 9, 2012 Author Share Posted December 9, 2012 I need that back!! That looks awesome!! Quote Link to comment Share on other sites More sharing options...
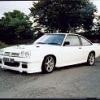
Kevin Abbott Posted December 23, 2012 Author Share Posted December 23, 2012 Pics from mantasports website 1 Quote Link to comment Share on other sites More sharing options...
SJ_Sathanas Posted January 11, 2013 Share Posted January 11, 2013 Wow I remember when I first saw this at the NW meet back around 2005 I think. Quote Link to comment Share on other sites More sharing options...
mantasrme Posted August 26, 2013 Share Posted August 26, 2013 So about time i updated this project again. There's been a small delay (its less than a year so that's small right ) since the last update as the mancona had to take a back seat (or corner of the workshop) due to both myself and Andrew being to busy to get together and work out a plan for progress on the shell. I'd had the shell up on the spit and scraped back the under-seal followed by a poke around which revealed a bit more work than original thought Both chassis legs had been patched in the past and while mostly solid were just starting to show rust poking through Plus a few other bits that looked like they could do with a bit of attention while i was at it. So it was decided to replace both chassis rails, swan necks, and make jacking points to tie the rails to A pillars while it was all stripped and on the spit This is what the inner rail looked like after the outer rail was removed and all the rust was cleaned off. New piece of inner rail grafted back on I also cleaned the floor down to bare steel Then treated it with several layers of Bilt Hambers Hydrate 80 when the welding is finished this will be covered in paint then stonechip I fitted the new rear outer chassis rail, then turned my attention to the swan neck. It didn't look too bad from the outside But this was lurking inside # So the rusted section was removed, the floor above cleaned and treated Then a new inner fabricated Quote Link to comment Share on other sites More sharing options...
mantasrme Posted August 26, 2013 Share Posted August 26, 2013 Swan neck outer going on, bit more to fabricate All finished off and cleaned up With the chassis rail in the Floor is chopped out New rear floor in and Jacking point with reinforcing plate to tie chassis rail to A-pillar More to follow (as long as i remember to take my camera to the workshop again) 2 Quote Link to comment Share on other sites More sharing options...
opelmantagsi Posted August 27, 2013 Share Posted August 27, 2013 Very good pics, I like the idea of the box section, very clever and the covers look like factory, did you make those? Quote Link to comment Share on other sites More sharing options...
Devil Fish Posted August 27, 2013 Share Posted August 27, 2013 Nice! Always good seeing rust being taken out and the job being done properly. 1 Quote Link to comment Share on other sites More sharing options...
mantasrme Posted August 27, 2013 Share Posted August 27, 2013 Very good pics, I like the idea of the box section, very clever and the covers look like factory, did you make those? The covers are from Leidinger-Tuning, they are not a perfect replica of the original rails but you'd be hard pressed to tell once they're on the car. Mainly the lower part with the drain holes is a little wider, which actually helps as you can get the 40x40mm box section all the way down to the bottom This gives a good solid place to jack on afterwards without bending the rail. The 2 parts are made a little longer than needed so they can be trimmed down to fit you car. For the £110 or so for the pair of rear rails and swan necks its worth it in time saving over having to fold up your own parts and weld them on. It also looks a lot better when its all finished and looks original. 1 Quote Link to comment Share on other sites More sharing options...
opelmantagsi Posted August 28, 2013 Share Posted August 28, 2013 Good job, I will follow this thread with great interest, Kevin's brothers car I believe? Will be worth the time effort and money. Quote Link to comment Share on other sites More sharing options...
mantasrme Posted October 1, 2013 Share Posted October 1, 2013 Bit more progress. NS rear chassis rail and jacking point are on NS inner swan neck welded in and treated NS Swan neck outers welded on and ground down Oh and a little preview of something else for me to fit once i've finished putting he floors back in. 3 Quote Link to comment Share on other sites More sharing options...
Novasportc550 Posted October 1, 2013 Share Posted October 1, 2013 Nice work there... Quote Link to comment Share on other sites More sharing options...
Kevin Abbott Posted October 2, 2013 Author Share Posted October 2, 2013 Good to see my old Mancona coming on :-) Hey David that Bilt Hamber hydrate 80 stuff you out me onto is top stuff! Cage is gonna look great in a hatch, you don't see many of them. 1 Quote Link to comment Share on other sites More sharing options...
opelmantagsi Posted October 2, 2013 Share Posted October 2, 2013 this is going to be some motor, good to see its being done properly as well, awesome work. the mancona hatch look its awesome, this car will be a jaw dropper. Quote Link to comment Share on other sites More sharing options...
Kevin Abbott Posted November 10, 2013 Author Share Posted November 10, 2013 Any updates David? 1 Quote Link to comment Share on other sites More sharing options...
Kevin Abbott Posted November 14, 2013 Author Share Posted November 14, 2013 (edited) Any updates? Give Andy a bell to keep him in the loop Edited November 18, 2013 by Kevin Abbott Quote Link to comment Share on other sites More sharing options...

Recommended Posts
Join the conversation
You can post now and register later. If you have an account, sign in now to post with your account.