opel2000 Posted October 31, 2013 Share Posted October 31, 2013 Tidy looking 32 you have there mate, still enjoying my 33. really hope the Soarer engine fits, I've become a fan of Jap power over the last few years, but still love the Manta looks and driving feedback. Quote Link to comment Share on other sites More sharing options...
Julian Posted November 2, 2013 Share Posted November 2, 2013 You must be very busy down there, or has your computer died?!! I've sent you a couple of emails, to both addresses, but no answers!! looks like you have caught Manta Mania!!. 1 Quote Link to comment Share on other sites More sharing options...
stradacab Posted November 2, 2013 Share Posted November 2, 2013 I'll tell you what, if I could roll my Manta onto the lawn in that weather now I would be a happy man! It's all grey here....... Quote Link to comment Share on other sites More sharing options...
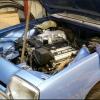
GTREA Posted November 3, 2013 Author Share Posted November 3, 2013 That comment gave me a laugh we're not that bad! Best of luck with the project it looks great so far! I do like to get an instant 'return on investment' on my 2nd hand car purchases, even if it is only a few Pence Tidy looking 32 you have there mate, still enjoying my 33. really hope the Soarer engine fits, I've become a fan of Jap power over the last few years, but still love the Manta looks and driving feedback. The 32 GTR is as new inside and out, hence considered finished, hence bored, hence Manta https://fbcdn-sphotos-e-a.akamaihd.net/hphotos-ak-frc1/201105_10151074693033342_12046803_o.jpg https://fbcdn-sphotos-a-a.akamaihd.net/hphotos-ak-frc1/219036_10151074693318342_2048241252_o.jpg https://fbcdn-sphotos-g-a.akamaihd.net/hphotos-ak-ash2/258330_10151074693623342_359955577_o.jpg https://fbcdn-sphotos-b-a.akamaihd.net/hphotos-ak-prn1/55871_10151074693113342_2083651307_o.jpg I was a fan of Aussie Holden Commodores here thru my youth, until I discovered Jap power by putting FJ20Ts, SR20DET's, and RB30T's into cars, they are so easy to extract power from, and simple to work on, you just cannot beat them for bang for your buck! Going by these CAD dimensions for the 1UZ, and a bare manta engine bay it looks like it is going to slot right in! For those interested and may have a bare engine bay to do some quick measuring for yourselfs Length: Dimension - 'C' - 63.5 cm (puts front of motor just back from front of sway bar) Sump Position: Dimension - 'J' - 23.0cm (230mm back from front of motor, slots perfectly between sway bar and Steering rack, leaving around 50mm or so for adjustment if needed) Width at top of engine: Dimesion - 'F' - 66.0cm ( now this is the exact same width as the gap between the Manta chassis rails, so if you look at the pic of my engine bay and follow that line up you can see it will hit the RHS of the brake booster, so that will have to be moved, and I will use a remote VH40 booster possibly mounted where the Battery goes and move battery to boot. Overall height of engine seems to fit under the bonnet ok, mounts are in similar location to Mantas, and the autos on these things are quite small physically, so hoping that will fit the tunnel OK (the manual definately would not) Feel free to quote this post for LOLs if it all turns to shit You must be very busy down there, or has your computer died?!! I've sent you a couple of emails, to both addresses, but no answers!! looks like you have caught Manta Mania!!. Finally got around to replying, Scraping and wire wheeling under a car suspended just above my head each day leaves me no energy in my arms to post I'll tell you what, if I could roll my Manta onto the lawn in that weather now I would be a happy man! It's all grey here....... Yeah I do not know how you guys work on cars over there, cold weather, sometimes no or small garage's...respect! In other news, Just bought this for the Manta, from Tasmania of all places!?, $12AUD, will be nice touch to keep in the glovebox. Just got your licence? Just got your car? Been given a company car and think the included log book is plain and uninteresting? Well do we have something for you! Measuring 14.5cm by 11cm when closed (29cm by 11cm when open) it's in perfect condition with all the pages intact and has never been used. Hard covered and made in Singapore it features a red car on the front (I think it's a Camaro Berlinetta) and fake wood grain on the back. A Camaro Berlinetta? Quote Link to comment Share on other sites More sharing options...
Manta again Posted November 5, 2013 Share Posted November 5, 2013 Love the work detailing the engine size. Lets see how she sits in the engine bay. Quote Link to comment Share on other sites More sharing options...
GTREA Posted November 6, 2013 Author Share Posted November 6, 2013 Maths was never my strong point at school....lunch was....so my calculations could easily all be wrong Question: Are Holden Gemini front brakes (Vauxhall Chevette) interchangeable with the Mantas? I want to buy / fit this kit, which is a bolt on for a Gemini http://www.turbogemini.com/Option%203%20-%20Big%20Disks.htm I was under the impression they were? Quote Link to comment Share on other sites More sharing options...
GTREA Posted December 2, 2013 Author Share Posted December 2, 2013 No engine in yet, but still some progress to report As she sits tonight Off work tomorrow so going to get started on stripping down, cleaning, repairing, painting, Poly bushing, the frontend. Pulled the Diff out a few weeks back Found myself a spare key wired to the trailing arm mounts....looked like it was there since 1978 and was wrapped in what appeared to be cardboard, but resembled an egyptian mummy....still works! Diff cleaned up, rust treated, and painted.....diff could last 5 minutes or 5 years with the V8...but I want it to look good on the tow truck either way Pretty sure the Drum brakes wont make it back onto the car either, probably being replaced with this kit Back in the car, with Spax suspension and Poly bushed. Entire underside of car has been taken back to bare metal, removed of all underseal and wax oil, it has taken me weeks and weeks...and has been Rust treated and covered in a coat of rust shield underseal. I am not bothering with Media blasting, due to the cost ($2500AUS), the climate the car is in now, Ive done most of the hard work already, all the rust will be cut out and fresh steel refitted, and the car will be fitted with chassis bracing Really having a lot of problems getting parts shipped. So thinking outside the square now, such as rather than replacing the rear guards, do this look instead, as it requires the guards to be cut (and hence rust removed) to be fitted http://classicdatsun.com/new/ZG-flares_inst.html They are from a 240Z, and should fit the manta well This car will be running 15x8" rims to clear the brakes so should fill them out nicely, and they are only $260 delivered....so worth a shot, if it does not work out no damage done. Other than that heres a few shots from the inside, there is a small rust hole in each corner, which, surprisingly is not as bad as I would have expected, and definately not as bad as alot of mantas I have seen in the build threads! 3 Quote Link to comment Share on other sites More sharing options...
Paul Barrett Posted December 2, 2013 Share Posted December 2, 2013 iv e given them JDM style arches a thought too for the A series, got to be worth a shot. good progress by the way! Quote Link to comment Share on other sites More sharing options...
Julian Posted December 2, 2013 Share Posted December 2, 2013 You made a good move there posting those pics,I was beginning to think you had given in! Fair play though you have been busy, and some good work being done. Looking forward to the next chapter. Quote Link to comment Share on other sites More sharing options...
stradacab Posted December 2, 2013 Share Posted December 2, 2013 You have pressed on, mind you, I wouldn't mind working in that garage! Keep us updated 1 Quote Link to comment Share on other sites More sharing options...
j4m1n Posted December 2, 2013 Share Posted December 2, 2013 Garage? It's got bloody coving! Keep up the good work bud 1 Quote Link to comment Share on other sites More sharing options...
GTREA Posted December 19, 2013 Author Share Posted December 19, 2013 As I ran out of talent welding within the 1st 5 minutes, I decided to do what any self respecting male would do.....and gave up. So here she is off to a body shop for a few months to have the all the rust cut out Not a cheap exercise, at $65ph and even though he reckons the car is solid, says theres some 80hrs work involved. Hes an old Kiwi bloke, works on vintage and classic cars, and told me this JUST scrapes in! (in Australia a 1978 car is not necessarily that rare! 2 Quote Link to comment Share on other sites More sharing options...
smiffy220 Posted December 19, 2013 Share Posted December 19, 2013 Must also have a certain 'rare' appeal over there too though eh? Quote Link to comment Share on other sites More sharing options...
GTREA Posted December 24, 2013 Author Share Posted December 24, 2013 Got a few screen caps from a home movie, this is reason why I am into Asconas / Mantas....................and fashion obviously! 1 Quote Link to comment Share on other sites More sharing options...
GTREA Posted December 24, 2013 Author Share Posted December 24, 2013 VPY297S was last registered 6/93 I think Quote Link to comment Share on other sites More sharing options...
opelmantagsi Posted December 25, 2013 Share Posted December 25, 2013 The screen shots came out well. Quote Link to comment Share on other sites More sharing options...
GTREA Posted January 3, 2014 Author Share Posted January 3, 2014 (edited) They are not to bad considering it was taken from Dads old home movie reels which I had converted to DVD about 10 or so years ago for him....still took lots of 'Still advancing' to get an un-blurred shot to capture though Popped in to see progress on rust repairs today, he seems to be going alright, still alot of tidying up to do but you get the idea. On the hoist, can see inside wheel well repair, and top / bottom of A pillar Side on, showing repair to Swan neck as well. Same deal Drivers side As above Just starting on rear arches, a bit of work required on inner sills still. But has already made all patch panels Rear of same arch, again patch panel already formed, and is a perfect fit. Front passenger floor Battery tray. Rust around rear window, front perfect. Edited January 3, 2014 by GTREA 5 Quote Link to comment Share on other sites More sharing options...
CRAZYDAVE Posted January 3, 2014 Share Posted January 3, 2014 Nice work Quote Link to comment Share on other sites More sharing options...
opelmantagsi Posted January 5, 2014 Share Posted January 5, 2014 Looks like he is cracking on there mate. Quote Link to comment Share on other sites More sharing options...
GTREA Posted January 7, 2014 Author Share Posted January 7, 2014 I know you guys love the rust ...so heres a few more progress pics. Starting to form a rear arch, it has been rolled to accomadate wider rims and tyres, and I think its safe to say I could drive a bus into them and they would not deform....there solid! Working on the inner sills Cut out the rear seat belt mounts Two patch panels held together here. that one rust area contains 6 flat surfaces he has to form....and to think I was considering doing this! Back of that same arch Holding up the repair panel he made for the drivers side rear arch 3 Quote Link to comment Share on other sites More sharing options...
GTREA Posted January 7, 2014 Author Share Posted January 7, 2014 Mate on an Aussie forum I am on is doing the 1UZ conversion into a 910 Bluebird. Fits like a glove, did this in a weekend! Still needs exhaust (and a myriad of other little jobs) but is running....wish I was at this stage. https://www.youtube.com/watch?v=l3EpSe6yBj4 1 Quote Link to comment Share on other sites More sharing options...
opelmantagsi Posted January 8, 2014 Share Posted January 8, 2014 looks like your guy is a dab hand with a shrinker / stretcher, one of the best panels tools anyone can buy, I have had a lot of use out of my one. rear arch panel repair coming on nicely. Quote Link to comment Share on other sites More sharing options...
GTREA Posted January 15, 2014 Author Share Posted January 15, 2014 Still more rust repair photos, progress has slowed a bit as its been a little hot in Perth this last week or so....to hot to be out in the shed. Patch panel for boot floor Cleaning up around rear window Drivers side arch repair Passenger side rear arch starting to look better Inside of rear passenger arch, he said 9 patch panels were required in here in the end!, still needs a little cleaning up. Same repair from inside car It was decided my guards were to far gone, so I bought a set from Derek in NZ Just because there in New Zealand and im in Australia does not mean postage is any cheaper than from UK, AUS$598 to ship!, bloody quick though, picked up yesterday from Dereks within an hour of calling, and have arrived in Australia already! Dereks a legend to deal with, I wish everyone were this good....... guards even came with a free Air conditioner! 4 Quote Link to comment Share on other sites More sharing options...
opelmantagsi Posted January 15, 2014 Share Posted January 15, 2014 (edited) Good progress. Why is the drum off the rear brakes? Yeah I think I have paid enough in freighting parts from the UK to have flown home to the UK and just come back with cases of parts and had money left over. The courier divers are on first name terms now when they arrive, it's Hi Derek..more cars parts from the UK for you....like I need the missus hearing that every time they arrive and I am not around. Sorry to disappoint, the 2 x AC units have long since been fitted, I just keep the boxes for car part storage. And the missus thinks it's just some AC gear I have here organised for a job. It's a cunning way of hiding the evidence Let's hope you don't get pinged at the border for taxes. Edited January 15, 2014 by opelmantagsi Quote Link to comment Share on other sites More sharing options...
GTREA Posted January 23, 2014 Author Share Posted January 23, 2014 The rear drums I left off as I broke the rusty retaining springs, and I only had one day to get the car back together (rolling) to drop off at the rust guys house as he wanted it asap to fit in before another job, Brake drums were binding so,....."stuff it it can go without" Not a lot of progress this last week, as its just been to hot here to be out in a shed welding. The new Guards from Derek arrived on Monday Dropped the guards off, and got a few pics, but even just standing in his shed taking pics it was to hot so left quick smart! Drivers side guard, filler sanded and smoothed, but both sides at bottom still need fabbing Inside that same guard, still cutting out previous repairs Drivers side rear guard now mostly complete The hot weather has not effected my eBay buying however, so.............. New aluminium radiator to suit the 1UZ-FE I want to retain the factory radio, and it will still function, but I will mount this under the drivers seat. Its a small amp (50wx2), there is a larger version (50wx4) as well. Basically you plug your iPhone or whatever into it and control your music from there, amp runs straight to speakers, does not interfere with factory setup whatsoever. With the iPhone that enables you to listen to Digital radio stations from all over the world.....I can tune into TFM from Teeside whilst cruising around in Australia (yeah ok so maybe not...but you get the idea ) Wheels..... I just went with a set of BBS replica's for now in a 15x8 and a +20 offset Also bought a set of Federal 595RSRs in a 205/50/15 Not my first choice, but they were a very good price. I have a set on my R32 GTR and they have lasted extremely well on the street, whilst still being competitive at track days....a good all rounder. .............and last but not least I bought another Opel Model for my collection 2 Quote Link to comment Share on other sites More sharing options...

Recommended Posts
Join the conversation
You can post now and register later. If you have an account, sign in now to post with your account.